How to position studio monitors in your room
When we consider studio monitors it’s usually in terms of their technology and performance, but there’s something else, something vital, that we should also always consider, because it can make or break the monitor’s performance.
We’re talking about the physical arrangement of the monitors in the studio room. Where will the monitors be located? How will they fit with everything else in the room? How far apart, and how far from room boundaries, will they be? In this blog post we’re going to look at the theory and practice of positioning monitors so that they have the best chance of performing optimally. Because no matter how well a pair of monitors performs “on paper”, if they’re not positioned in the studio thoughtfully and appropriately, you’ll never really hear their full potential.
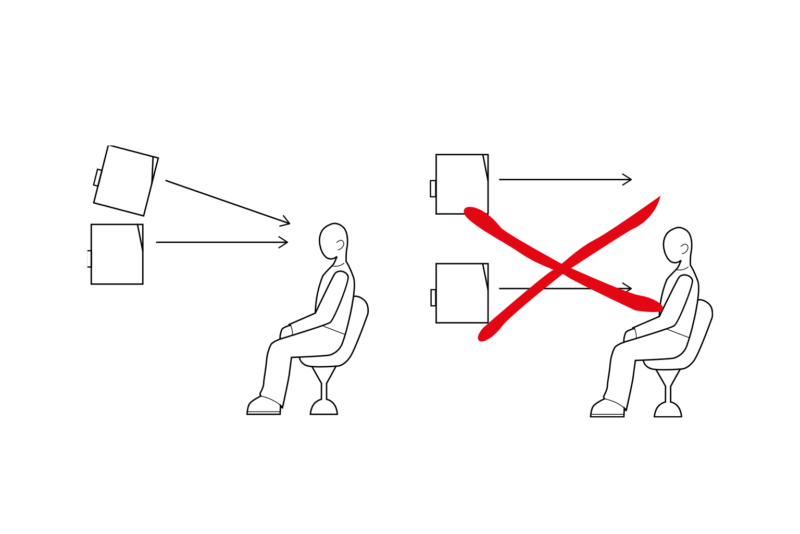
The basic idea of stereo (first proposed by British electronics engineer Alan Blumlein in 1931), and the ideal monitor position that arises from the idea is not rocket science. A pair of monitors and the listener’s head should form the apex points of an equilateral triangle, with the monitors turned inwards so that their front panels face the listener. For example, if the pair of monitors are, say, 1.5 meters apart in a studio room, the listening position should be 1.5 meters away from each speaker, or ca. 1.3 meters away from the baseline formed by the two speakers. So, the first priority of monitor positioning is to find an arrangement in your studio space that complies with the equilateral triangle principle. Even if this means moving things around, it will be worth the effort.
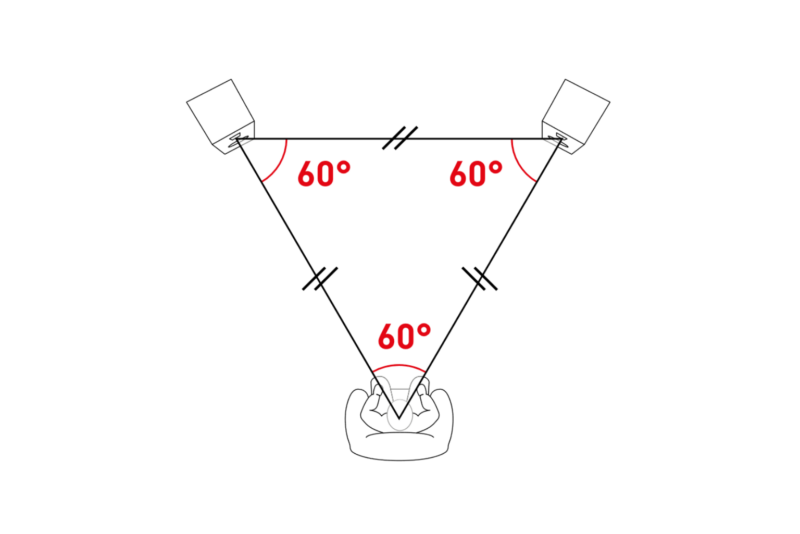
The two studio monitors and the listening position in a stereo setup should form an equilateral triangle.
In bigger studio spaces the equilateral triangle dimensions just increase in proportion until the listening position gets so far away that the listener is no longer in the monitor’s “nearfield” region but in the room’s ‘reverberant field’. We’ll describe the idea of nearfield and reverberant field and its implications for monitor positioning a little further down the page, but first there’s more to unpack around monitor positioning basics.
We used the example of monitors 1.5 m apart in the previous paragraph, and that distance is reasonably typical of compact studio arrangements using compact nearfield monitors such as the ADAM Audio A4V, for example. But in really small spaces, a pair of monitors might be as little as 1 m apart, and such an arrangement is perfectly viable if the equilateral triangle principle is implemented. Perhaps of more importance however than the minimum triangle size are the following factors:
- Monitor height in relation to the listener’s head-height.
- Monitor position in relation to the nearby rear and side walls of the studio space.
- The acoustic environment around the monitors such as the levels of nearby acoustic absorption and reflection.
Let’s go through those last three factors in order. Firstly, monitors are generally designed to be heard by a listener positioned on their perpendicular axis. Imagine a line in the air drawn outwards at 90° from a central point on a monitor’s front panel halfway between its bass driver and tweeter, also known as the “acoustical axis”. The line should intersect with the listener’s head at ear height. If the monitors are located significantly above or below ear-height they will not sound as intended and the result could be work that doesn’t translate as well as it might to alternative playback systems. A common example of how monitor height can go wrong is with small monitors placed on a desk. At desk height, the monitors will almost certainly be positioned well below ear-height. The solution is either to raise them up or angle them so that their perpendicular axis points upwards towards the listener’s head.
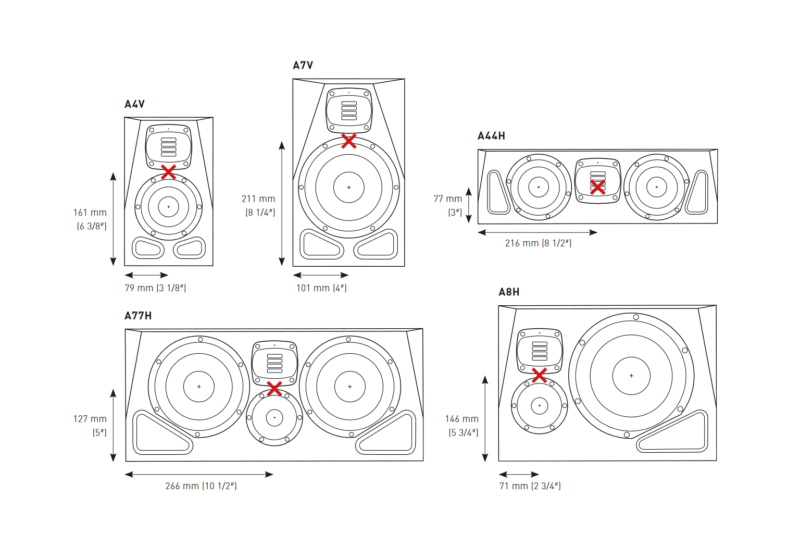
The acoustic axis (red X) of the different models of the ADAM Audio A Series.
A second important factor is the presence or absence of room boundaries close to the monitors. Each boundary that is closer than, say, 0.5 m will have a noticeable bass emphasizing effect. Bass emphasis, rather than full bandwidth emphasis, occurs because monitors naturally become more directional as frequency rises. This means that while bass sounds radiated backwards or sideways will be reflected from nearby walls and add to the direct sound, higher frequencies tend not to be radiated backwards or sideways to the same degree.
When monitors are positioned closer to walls the level of bass will increase by 0-4 dB per wall depending on how solid the wall is (brick gives a bigger boost than gypsum). Corners, which have two walls, are especially good at boosting the bass and should generally be avoided. Many monitors, including some from ADAM Audio, incorporate low frequency boundary EQ options designed to compensate for boundary bass emphasis, and it’s important the options are configured appropriately. The quick start guide supplied with the monitors or manuals available online will explain how to do this.
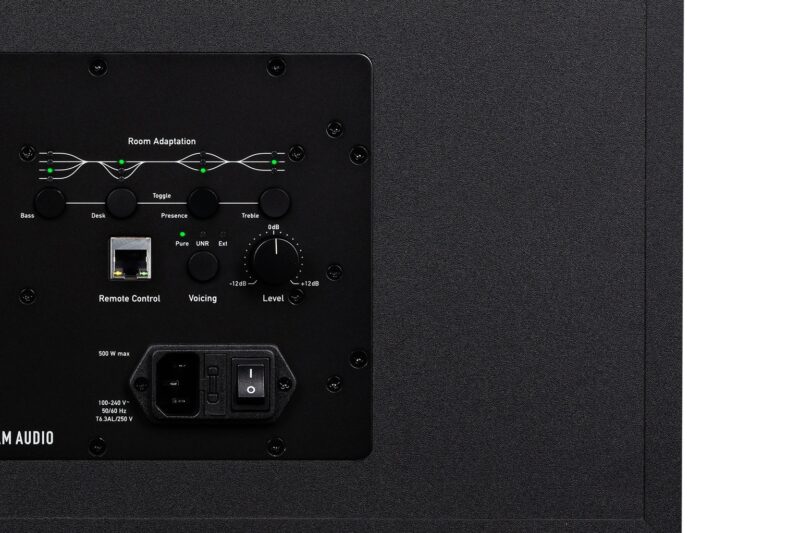
Room adaptation options on the backplate of an ADAM Audio A77H studio monitor.
At ADAM Audio, we generally advise that monitors should be positioned either closer than about 0.5 m to a rear wall (and the boundary EQ set appropriately); the realistic minimum being about 10 cm (to ensure proper heat dissipation, have room for cables, etc.), or positioned more than 1.5 m away from the wall. Intermediate positions tend to result in frequency response errors in the all-important low midrange frequency band caused by rear wall reflections, so are best avoided if possible.
The distance of the monitors from side walls not only has implications for low frequency emphasis but also influences the reflection of midrange and high frequency sound from the monitors to the listener. Maximizing the side wall distance is usually beneficial. It is important however to try and ensure that the distance from each side wall to the listening position, and the acoustic reflection quality of the side walls, is similar.
Correct vs incorrect tilting of studio monitors.
The third important factor we bullet-listed above is the acoustic character of the environment immediately around each monitor of the pair. By “acoustic character” we mean the level of acoustic reflectivity and/or absorption. Imagine a pair of monitors; one adjacent to a large glass window and one adjacent to a shelf full of books. Those are very different environments, one reflective, one absorptive, that will potentially result in a skewed stereo image as reflections from the monitor on the reflective side dominate.
A solution here might be to put a heavy curtain over the window near the monitor. Again, ensuring your pair of monitors is working in a similar environment might mean a degree of studio rearrangement, but it is likely to improve the quality and consistency of your creative output. Generally, the idea of achieving as much symmetry as possible between the left and right side of your listening position, will get you a long way. Any asymmetries that cannot be eliminated by the positioning itself, can perhaps be compensated with different means of acoustic treatment (see the window and book-shelf example), which is a whole topic on its own.
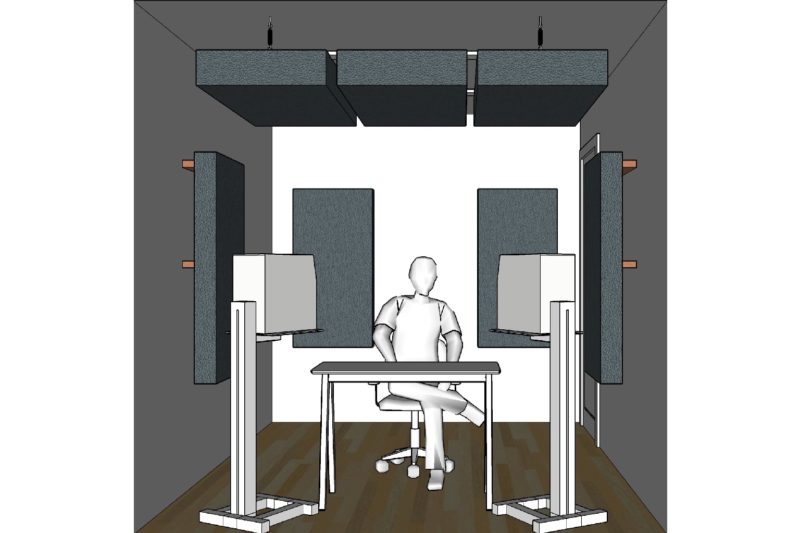
Example of a relatively small acoustically treated room with a stereo monitoring setup.
Finally, we introduced the concept of the nearfield and the reverberant field earlier and we’ll finish by explaining it a little. The two fields are generally defined such that when a listener is in the nearfield the sound they hear is predominantly the direct sound from the monitors, and when the listener is in the reverberant field, they predominately hear sound that has been reflected from the walls, floor and ceiling. In the reverberant field it’s more difficult for listeners to identify the location of sounds and to perceive focused stereo images. Now, in any studio room, there will be a distance from the monitors where the nearfield ends, and the reverberant field begins – this is called the “critical distance”. So, returning to the equilateral triangle principle we described earlier, if the monitors are placed too far apart for the size of the room, the listener will be in the reverberant field and be less able to make valid quality judgements about the sound. They will effectively be listening to the room more than the monitors.
The distance from the monitors where the reverberant field starts is defined by a wide variety of parameters; room size, monitor position, monitor dispersion characteristics, or room reverberation time, for example. But as a very general rule, to remain listening in the nearfield, the monitor spacing (and listening position distance) shouldn’t exceed, around one third the room’s average length and width dimension. So, for example, in a studio room measuring 4 m x 5 m (average 4.5 m) the monitors probably shouldn’t be more than about 1.5m apart.
As we wrote earlier in this post, monitor placement isn’t rocket science, but it can make all the difference. If you’ve invested in high quality monitoring for your studio to help you create good work, positioning the monitors thoughtfully and following the guidelines is part of the investment.
Top Posts
You might like
-
Do I Need Acoustic Treatment For My Home Studio Setup?
We get asked this question a lot. Acoustics, and the physics behind it, can be a daunting subject. In this article, we are going to simplify home studio acoustics, break it down into simple, useful strategies, and give you the knowledge to create the best possible acoustic environment for your…
-
Do I need a subwoofer for my home studio?
If you’re asking yourself whether you need a subwoofer for your studio, you’ve come to the right place. In this educational article, we’re going to shed some light on what to consider when thinking of adding a subwoofer to your home studio, how to calibrate it with your existing system…